
Making a woodwind key
Making a woodwind key
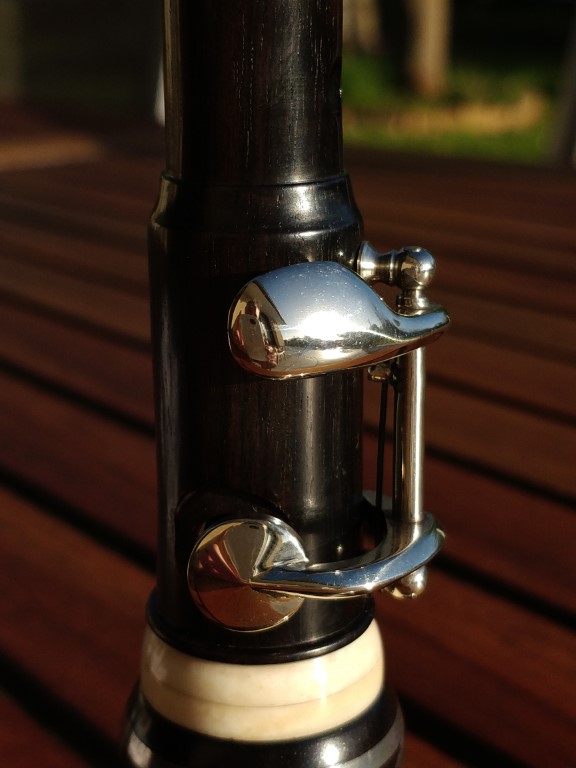
Table of contents :
Making a wind instrument key

Here is an article explaining how to make a wind instrument key.
In this example, it is a “normally open” key, of the same type that can be
found on clarinets or oboes.
Here, it is a Breton bombard key.
The necessary tooling is principally : a metal lathe, a small vise, all kinds
of files, a drill press and a torch for silver brazing.
The more specific tools are home made. I provide a link for explaining more in
details how the tools are made and how they are used.
Supplies

Here are the starting materials.
I use nickel silver, it is an alloy of copper, zinc and nickel.
The profiles used for this key: flat section 4mm x 12mm 3mm thick sheet tube, diameter 3mm x 2mm Round diameter 12mm round diameter 1.9 mm (for the axis)
The cup

Machining of the cup that holds the pad.
In my case, I machine it out of solid 12mm diameter stock.
This piece can also be stamped in a thin sheet of nickel silver.
Here, machining of the outer cone, 120 °.

Installing a chuck depth stop, see this tool on homemadetools.net

Holding the cup in the chuck, against the stop.

Boring inside the cup. See this tool on homemadetools.net

Pressure turning the cup between centers, adjusting the outer diameter.
The body of the key

Cutting the body of the key out of a 3mm nickel silver sheet.

Shaping with files.

The body is drilled for the passage of the tube.
Shaping of the upper chamfer.
Ball posts

Making a ball rod. Roughing out the threaded end on the lathe. Thread cutting with an M3 die. Do not forget the drop of oil.

Small throat at the base of the ball, with a form tool.

Shoulder, with the parting tool.

After parting off, chucking back using a steel mandrel, the ball being screwed in the mandrel.

Machining the ball with a dedicated tool. See this tool on homemadetools.net

The compound slide is angled, 30°.

First, progressing using the CROSS slide, until the ball is half formed.

Second, progressing using the COMPOUND slide, following the angle of 30°.

Finishing the ball with file.

Refining shapes with a needle file.

Polishing with fine grit sandpaper and steel wool.

A completed ball post. Diameter is 5mm.

I take the opportunity to make a small batch of balls posts.
Drilling the ball posts

After drilling and tapping the wood on the instrument, and screwing the ball posts thoroughly, marking the axis of the key.

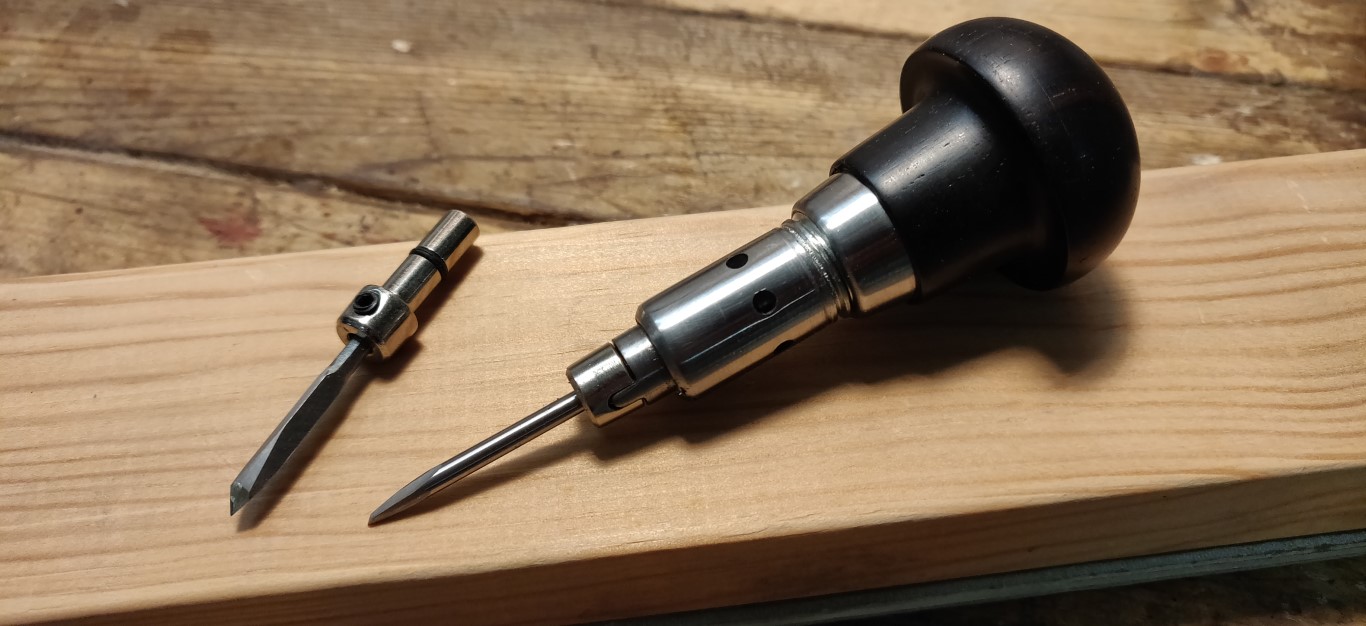
This tool will allow to drill the balls from side to side. See this tool on homemadetools.net

The two screws are center drilled and serve as drilling guides.

The tool assembled. The ball post to be drilled is inside, taken under pressure between the two drilling guides.

Drilling. Do not forget the drop of lubricant.

Drilling.

The drilled ball post, right in the center.

M2 tapping.

Threading the hinge rod, M2.

The hinge rod is perpendicular to the axis of the post.

The hinge rod is mounted on the ball posts. One end is threaded into the ball, the other is smooth and has a slot to accept a screwdriver.

The ends of the tube that will come against the balls are inner chamfered.

Dry mounting the tube on the hinge rod and the body on the tube.

Dry mounting of the cup on the hole of the instrument with a pad. At this point, adjust the position of the arm on the cup.
The spring

Drilling, 0.6mm diameter, of the spring hole on the post. This is the most delicate step!

It takes a chuck of good quality, turn very fast and a drop of oil. The spring is slightly flattened to lock into the hole and I add a tiny drop of Loctite.
The key

The nickel silver cold forges very badly (it comes brittle and breaks), it is better to work it hot. Here we start with a piece of rectangular section 4mm x 12mm.

Forming the curve …

… following the pattern.

the lower part is flattened and widened, the upper part is crushed in the other direction to make it thicker.

After forging, dressing on one side flat with a file.

Dressing on one side with a file.

File shaping.

File shaping.

Dry mounted.
Brazing

The parts are ready to be assembled by brazing.

Setting the arm on the cup.

Silver solder and flux (borax) are used.

Local application of the flux.

Heating.
When several elements are already assembled, it is necessary to heat very locally.
This nozzle is a little too big, I then use a micro-nozzle for jewelery.

The solder must be invisible. Much care must be taken in mounting and positioning parts.

Soldering the body on the tube.

Using the micro-nozzle for a very local heating.

Soldering the stop for the spring. I leave it longer than necessary …

I position it with brass wire. The vice clamp acts as a heat sink and prevents overheating of the seal of the previously soldered key.

Brazing is finished. The spring stop is cut and a small notch to hold the spring is filed.
Polishing

Cleaning with sandpaper, 600 grit and above.

Polishing on a hard cotton disc, brown paste then blue paste.

There you go …
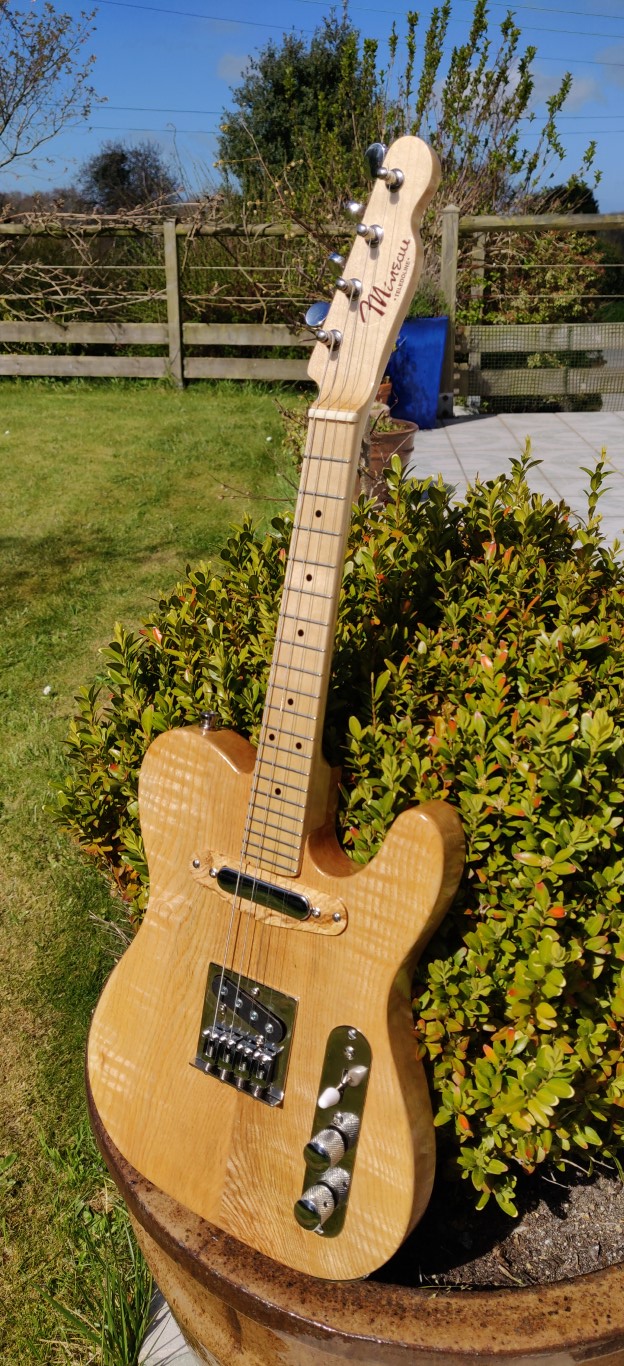
You can see the finished instrument with this key mounted in this
article.
Do not hesitate to react to this article in case of question or you can
contact me
also on my Facebook page.
Good machining !
Christophe
(PS I remind you that I do not sell my creations or my services, this
information is published only for purposes of sharing and mutual aid for
amateur makers.)

Older readers comments