
Long holes boring
Long holes boring
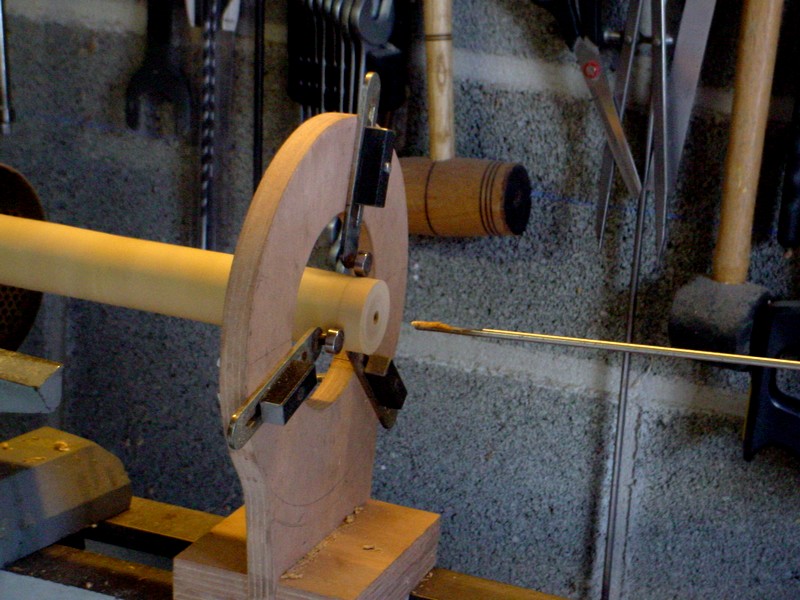
Table of contents :
Long holes boring

The making of woodwind instruments implies to be able to bore, from one end to
the other, a piece of wood, usually very hard, of small diameter and of great
length.
The bore is actually a first roughing step, which will be followed by a
finishing step using a tool called a reamer. (See this other article about
tapered reamers. )
The bore may be simply cylindrical or, in the case of a conical bore, roughed out by step drilling. The following image shows an example of a stepped bore.

Roughing out a tapered bore by step drilling
For a cylindrical bore, and from a certain diameter (say from 10 mm), it is possible to simply use a long twist bit for wood, which tool is quite easy to obtain.

A long wood twist drill.
But one must know that these twist bits are extremely flexible and that they
have the drawback of following the fibers of the wood.
For a small diameter bore,it is therefore not at all advisable to use such a
twist bit.
These bits deviate enormously and there is little chance of drilling a hole
really straight.
For tapered bore, they will be roughed out, as shown in the photo above, by
several successive cylindrical holes.
The easiest way to do this is to start with the smallest diameter to establish
a first straight guiding hole.
Then it is easy to use long twist drill bits, of progressive diameter to
enlarge this first hole.
The use of tapered metal drill bits ensures concentricity with the first
guiding hole.
The following image shows, from left to right:
- A set of twist drill bits of different diameters which allow to enlarge
the initial guiding hole.
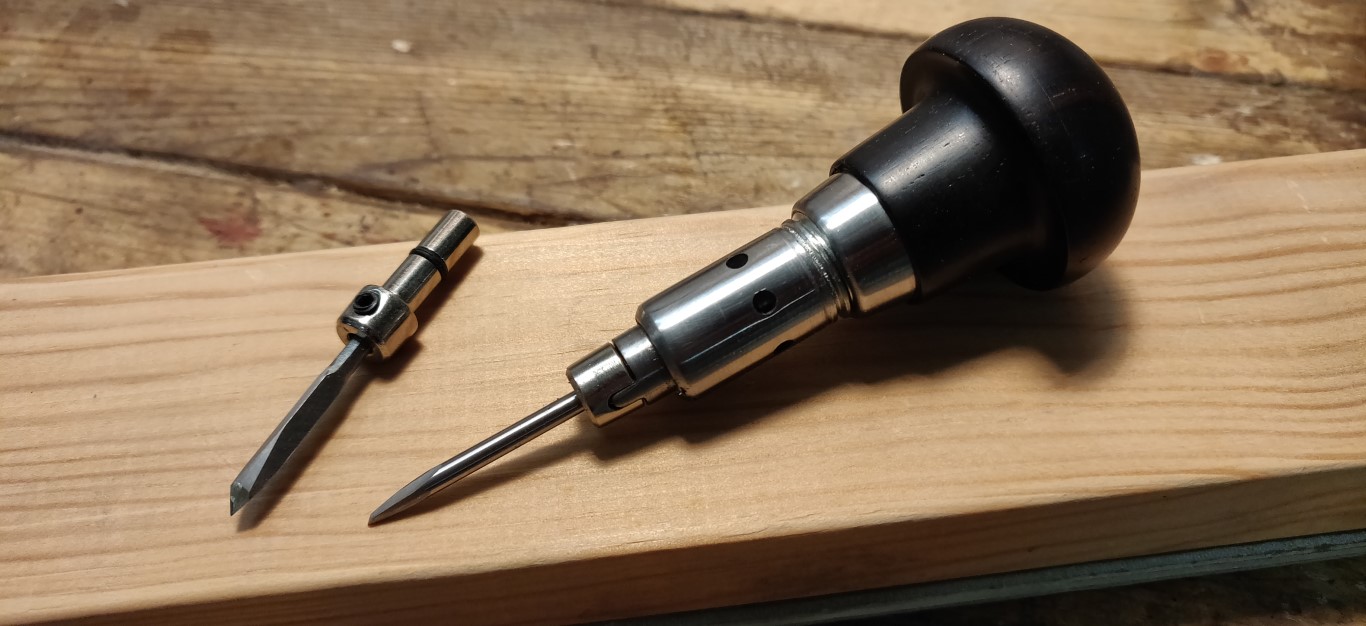
- “D-bit” bits of different diameters, see below their use.
- The case of a D-Bits with guide pin to widen a 10 to 11mm bore.
- A 12mm machine reamer, welded to an extension rod

Twist drill bits, D-bit, D-bit with guide pin, cylindrical reamer.
The real difficulty, especially for stepped holes, is to make the first hole that corresponds to the thinnest diameter, and which will serve as a guide for the following holes.
Both of the drilling techniques presented here require the use of a lathe,
which may be a wood lathe.
They also require the use of a steady rest.
Here are the different models of steady rest that I use :
- [For the wood lathe, smal steady :
](http://www.homemadetools.net/forum/steady-rest-smaller-
model-14115#post17740) 
- For the wood lathe, large steady :

- [For the metal lathe, steady modified with ball bearings :
](http://www.homemadetools.net/forum/metal-lathe-steady-rest-mod-ball-
bearings-59808#post90043) 
1st method: the D-bits
The first method is the simplest and the least expensive.
It uses bits named “D-bits”.
The “D” of D-bits corresponds to the shape of the end, shown in section.
The starting point is a tool steel rod, ideally a HSS bar brazed at the end on
a steel rod, but a stainless steel rod also works.
We need to shape a flat section, taking care that the flat part does not
exceed the median line.
The end is then beveled so as to have a sharp edge on the left.
The following illustration shows the profile of a D-Bit.
The small transversal groove formed on the flat section serves to catch the
chip for better ejection when pulling out the tool from the piece.
The flat part is between 20 and 30 mm long.

D-bit profile.
×
- 1 -

|
- 2 -

—|—
D-bit, flat section, and small groove for catching the chip. The tip is beveled , forming a cutting edge on the left side.
|
The section in “D”.
- 3 -

|
- 4 -

If the bed of the lathe is too short, the bit can be used in a hand-help chuck.
|
Before each pass, I dip the tool in a linseed oil.
- 5 -

|
- 6 -

Here a test piece of beech, without using any steady rest. (Stiff enough). The first step is to drill a pilot hole with a short drill bit, as accurate as possible.
|
Progressing by very small passes, no more than 5mm at a time. Do not forget that the only room to store the chip inside the hole is the flat section. So we can only remove a small amount of wood at a time.
- 7 -

|
- 8 -

The tool is often pulled back to remove the chip which keeps bound to the flat surface. Linseed oil helps compacting the chip and the small groove helps pull back the chip with the tool.
|
And so on, without forgetting to lubricate well. Friction becomes more important as the tool gets deeper.
- 9 -

|
- 10 -

Result on this piece of beech, we get out on the other side right in the center.
|
The entrance of the hole.
- 11 -

|
- 12 -

Here is a 340mm long piece of boxwood. The piece is longer and narrower, so we install a steady rest. The piece is centered first using the live center in the tailstock. The bearings are put in place against the workpiece, and the tailstock can be pulled back.
|
In this technique, initial centering is very important to stay in the axis.
- 13 -

|
- 14 -

Drilling the pilot hole. I use a good quality drill bit, the same diameter as the D-bit.
|
Linseed oil…
- 15 -

|
- 16 -
Starting well in the axis. The tool guides itself, following the pilot hole, hence its crucial importance.
|
Removing the tool, the chip comes out, very compact, thanks to the oil.
- 17 -

|
- 18 -

Do not try to go too fast.
|
Close up on the chip.
- 19 -

|
- 20 -

At the exit, slight deviation of about 6mm, which is not dramatic for a 4mm hole over 340mm in length.
|
The deviation, despite all the care that can be taken, is quite common. The figure above shows how the piece can be re-turned between centers.
2nd method: using Gun drills
This second method calls for more expensive and difficult equipment to procure
and also requires the making of additional tooling.
The tool used is called a “Gun Drill”. These are industrial tools used for
boring long and narrow holes, in the hardest metals.
As their name suggests, these tools are used in the firearms industry. (Just
as their ancestor, the D-bit shown above, was.)
The Gun-Drill is an extremely powerful tool, and the hardest woods do not
scare him, since its tip is made of tungsten carbide.
Comparing to the previous method, which was long and laborious, this one is
fast and easy. The video below shows the boring of a piece of 280 mm ebony
in just over a minute, in a single pass, with a tool only 3.6mm in diameter.
The Gun-drill is a tool that features a carbide head and a V-flute along its
entire length, which allows the evacuation of the chip (hence the possible
drilling in a single pass). But the most interesting feature of this tool is
that it has a part through hole designed to convey a fluid for cooling and
lubrication.
In industry, these tools are used with pressurized oil, but in our case, we
just use compressed air.
The purpose of the compressed air is to cool the bore and also to evacuate the
chip to the outlet.
Using gun drills necessitates some additional tooling. It first takes having a lathe with a longer bed, to be able to use the tailstock as support for the tool.
[An adapter](http://www.homemadetools.net/forum/gun-drill-attachment-light- duty-41443#post59715) is also needed to insufflate air through the end of the gun drill. I made mine out of aluminum, it has a morse taper that fits into the quill of the tailstock.
Finally, it is essential [to connect a vacuum system](http://www.homemadetools.net/forum/gun-drill-setup- wood-41533#post59905) to the exit of the workpiece, because otherwise, the very fine chips pushed by the compressed air would fly away throughout the entire workshop !
- 1 -

|
Here are 3 gun-drills of different sizes. Note the small hole at the end.
—|—
- 2 -

|
Here is the adapter that fits the quill of the tailstock. The hose connects the compressor for injecting air up to the head of the tool. The air-tightness around the tail of the gun-drill is simply achieved using Teflon tape.
- 3 -

|
I have since added a tap on the pipe.
- 4 -

|
Gun drill and adapter in place.
- 5 -

|
The vacuum fixture, to be attached to the steady rest.
The following video shows an example of use.
I must add that the inner surface finish with the gun drill is excellent,
there is no need for using a reamer afterwards.
As a followup I suggest to read the article showing how I make tapered or
straight reamers.
For straight reamers, see also in one of the pictures at the beginning of this
article an example of machine reamer welded to an extension rod.
See also the article on the making of a tapered bore flute.
I hope that these few explanations will be of some help for any one wishing to
make his own woodwind instruments !
Feel free to comment here below, or on my Facebook page.
Christophe

Older readers comments
Hello from mike_vidal